The arduino can measure a capacitor with only two resistors in a range from 10nF to 2000 uF. The theory, the simple circuit on a bread board and the Arduino program explained.
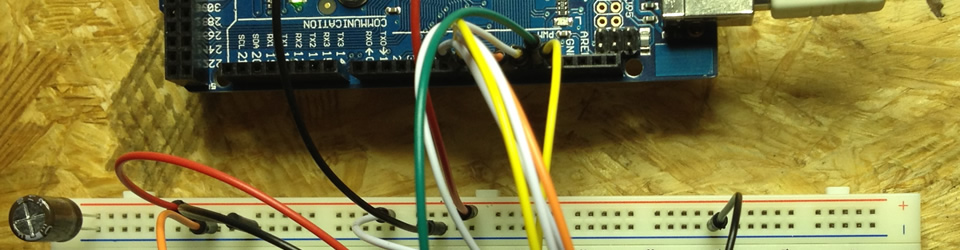
the circuit:

the program:
// Arduino measures capacitor 10nF to 2000uF
//
// Matthias Busse 12.12.2020 version 1.2

#define chargePin A4           // capacitor charge pin over a 10kOhm resistor
#define dischargePin A5        // capacitor discharge pin over a 220 Ohm resistor
#define measurePin A6          // AD input
#define resistor  9996.0F      // 10 kOhm > measured 9,996 kOhm

long startTime, passedTime;
float microFarad, nanoFarad;

void setup() {
  pinMode(chargePin, OUTPUT);  // chargePin as output
  digitalWrite(chargePin, LOW);
  Serial.begin(38400);         // serial output
  Serial.println("measure capacitance version 1.2");
}

void loop() {
  // 1. charge the capacitor and measure time
  digitalWrite(chargePin, HIGH);            // chargePin to 5V, the charging starts
  startTime = micros();                     // store start time
  while(analogRead(measurePin) < 648){}     // until 647 is measured, that is 63.2% of 1023
  passedTime= micros() - startTime - 114;   // subtract zero-time (112-116 us)
  if(passedTime > 2147483647) passedTime = 0; // set minus values to zero (type is long)
 // us to seconds ( 10^-6 ) and Farad to mikroFarad ( 10^-6 ),  netto none
  microFarad = ((float)passedTime / resistor);
  // 2. output value
  Serial.print(passedTime);                 // time output
  Serial.print(" nS    ");

  if (microFarad > 1){
    if(microFarad < 100) {
      Serial.print(microFarad,2);           // uF.xx output
      Serial.println(" uF");
    }
    else {
      Serial.print((long)microFarad);       // uF output
      Serial.println(" uF");
    }
  }
  else {
    nanoFarad = microFarad * 1000.0;        // calculate nF
    if(nanoFarad > 10) {
      Serial.print((long)nanoFarad);        // nF output
      Serial.println(" nF");
      }
    else
      Serial.println("smaller than 10 nF - no measurement");
  }
  // 3. discharge capacitor
  digitalWrite(chargePin, LOW);             // chargePin to 0V
  pinMode(dischargePin, OUTPUT);            // dischargePin now is output
  digitalWrite(dischargePin, LOW);          // dischargePin to 0V
  while(analogRead(measurePin) > 0){}       // until the capacitor is discharged (0V)
  pinMode(dischargePin, INPUT);             // dischargePin now is input
  // 4. wait
  while((micros() - startTime) < 500000){}  // wait until 500ms, this will print two outputs per seconds.
}
by Matthias Busse @Youtube
Awesome, Matthias! This is a challenge I always wanted to address with a microcontroller.
I remeber when I gut my licence, the uncertancy with most capacitors and coils about their capacity/inductance. Today an Arduino makes life more easy.
Do you see a realistic chance to optimize the circuit to also measure in the pico farad region?
AADE (owner recently passes away) once supplied a famous PIC based measurement device. Applying a similar circuit, should bring the Arduino to similar results. I remember the probes need to be calibrated for each appliance, first.
Would you assume the circuit and/or program could be tweeked or are there obvious limitations?
Handbreit / vy 73
-Pit, DF5CL
Hello Pit,
if you increase the charge capacitor to 100 kOhm you can measure down to 1nF. Maybe you can increase it a bit more, but you have to take care of the input resistance of the both other Arduino pins connected to the + line. If the restistance is stable, you can add them to the calculation? Try it.
Handbreit,
Matthias